There are many processes in Chemistry and when learning about them, it can be very useful to summarise them. Process diagrams, flow diagrams, process maps – whatever you call them – outline the important steps. A process starts in one situation and goes through a sequence of steps to end in a different situation. Like a story, a process has a beginning, a middle and an end. Consider how you might summarise some of the key processes you have to learn in Chemistry. To help you to get the hang of it (I find that students tend to use too many words) I will give you five.
Process 1: Fractional distillation
Fractional Distillation of Crude Oil
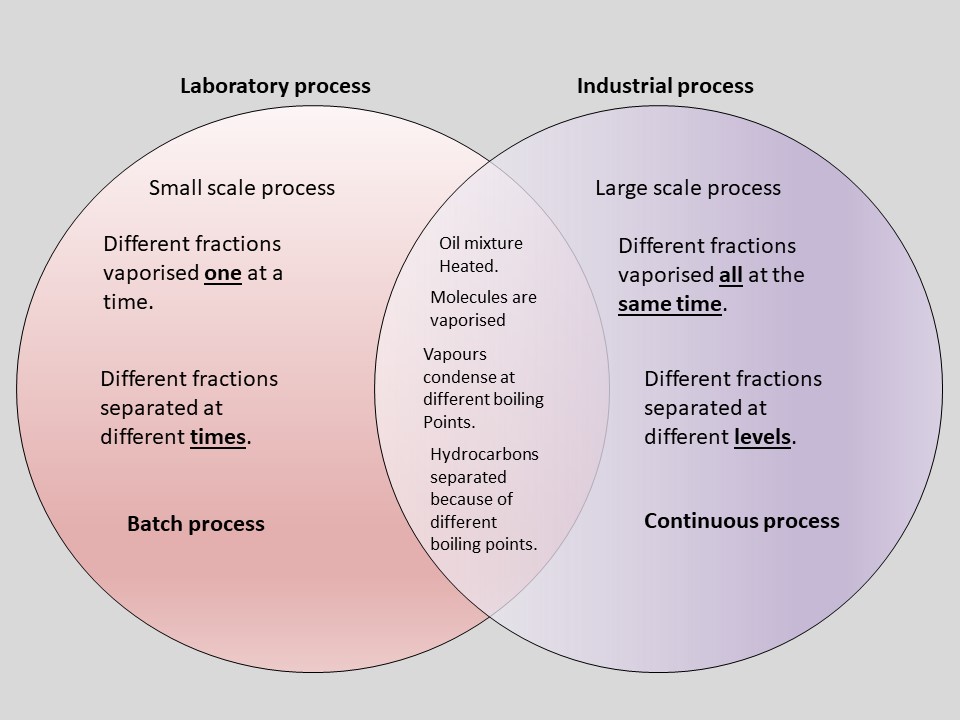
Consider the Fractional distillation of Crude Oil. It is a process I am sure you are familiar with. I have written about it in a previous post. Previously I compared the Laboratory procedure with the Industrial procedure in a Venn diagram. If we look at the intersection, there are four steps both procedures have in common. It is these common steps, in the correct sequence, that I would summarise in my process diagram. The point of the diagram is to get the correct sequence with the minimum amount of words to memorise. I would memorise the four key words in bold as the skeleton of my description. The sub descriptions in italics are some of the other points to get across to flesh it out. It is worth noting that this process fits fractional distillation of any mixture of miscible liquids, not just crude oil. It is the same story.
Process diagram for Fractinal Distillation
Process 2: Mole Calculations
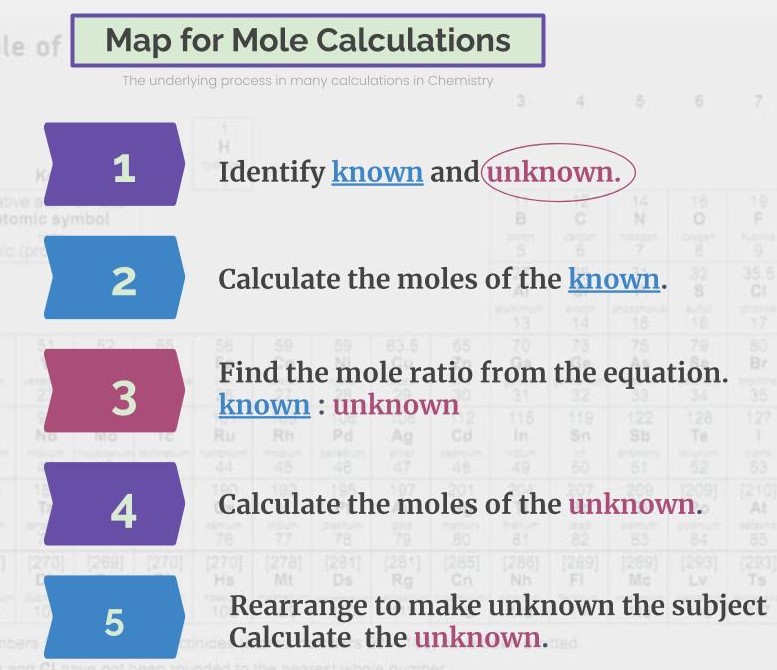
My Process Map for Mole Calculations is one of my favourites. It is one I have used most often to help students with this area of Chemistry that many grapple with when they first learn about it. Have you ever had the experience when learning maths, that you follow the teacher’s explanation, and you work through the steps they have shown you, even if you feel wobbly, and then at some point it suddenly clicks? It is what happens here. Sometimes, the questions are nice, and they break it down step by step for you, with each step assigned 1 or 2 marks. They might swap my steps 2 and 3 around in their sequence, but it is this structure that underlies those questions. They might also have hidden in the question some additional “frilly” bits, for example, unit conversions, that you need to watch out for.
How to do Mole Calculations in Chemistry.
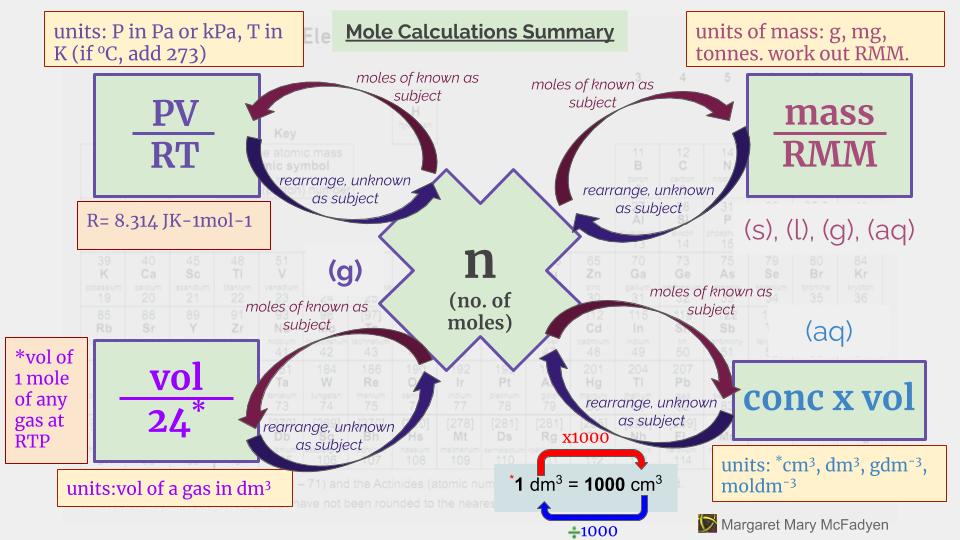
Sometimes, you are just given the question, with no break down, and you have to work through it for yourself. The Map for Mole Claculations shows the process you need to follow. In addition, it is important to recognise in the question which formulae you need to use to calculate the moles of the known substance or to rearrange to calculate the unkown quantity being asked for. For instance, you might be given the concentration of hydrochloric acid in moldm^-3 and be asked to find the volume of carbon dioxide produced by reaction with calcium carbonate, in cm^3. My Infographic can help you to be clear on the possibilities and to know which ones to use. You can download a copy of My Map for Mole Calculations and Infographic here.
Mole Calculations Summary Infographic
Process 3: Stages in a Laboratory Preparation.
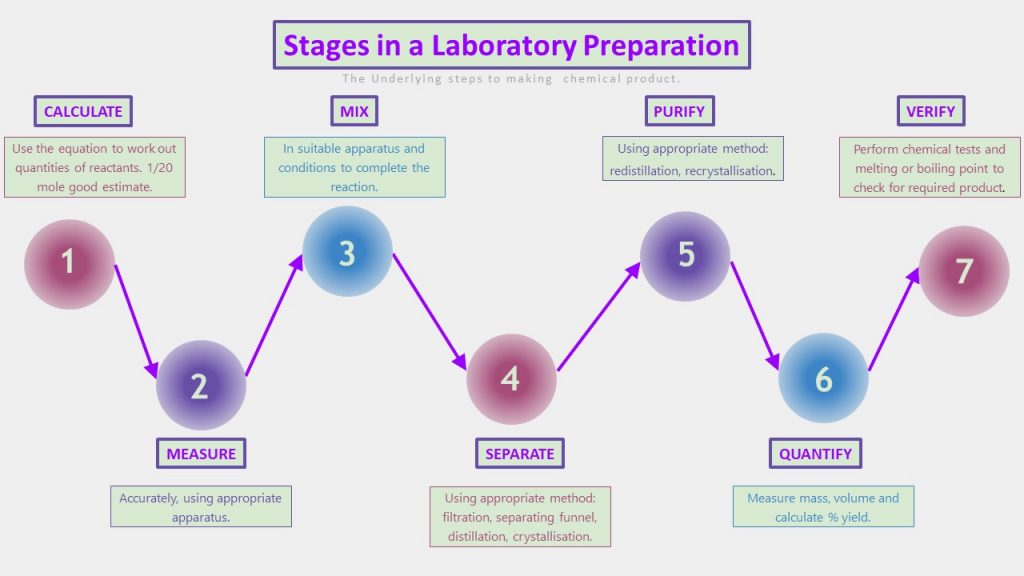
Chemists make chemical products: that is what chemists do. Moreover, just as it is useful to know the underlying process in mole calculations, it is also helpful to understand the underlying process in preparing a chemical product. When you are clear on each part of the process and what it is for, it is much easier to know what needs to be described and what comes next. Understanding where you are in the process allows you to describe the subsequent or previous step. It does not matter which part of the process you are asked about if you know where you are. The specific stages have their own processes and which technique you use will depend on the product you are making.
Making a Chemical Product
Look at one of the experimental methods you have use to make a product in Chemistry. Try to match the stages of the method to the process outlined below. Look at some exam questions also. You might notice that it focuses on a small section of this process. You might notice that sometimes, more than one step, for example, separate and purify, can be achieved in one practical process.
Process 4: Writing Ionic Equations
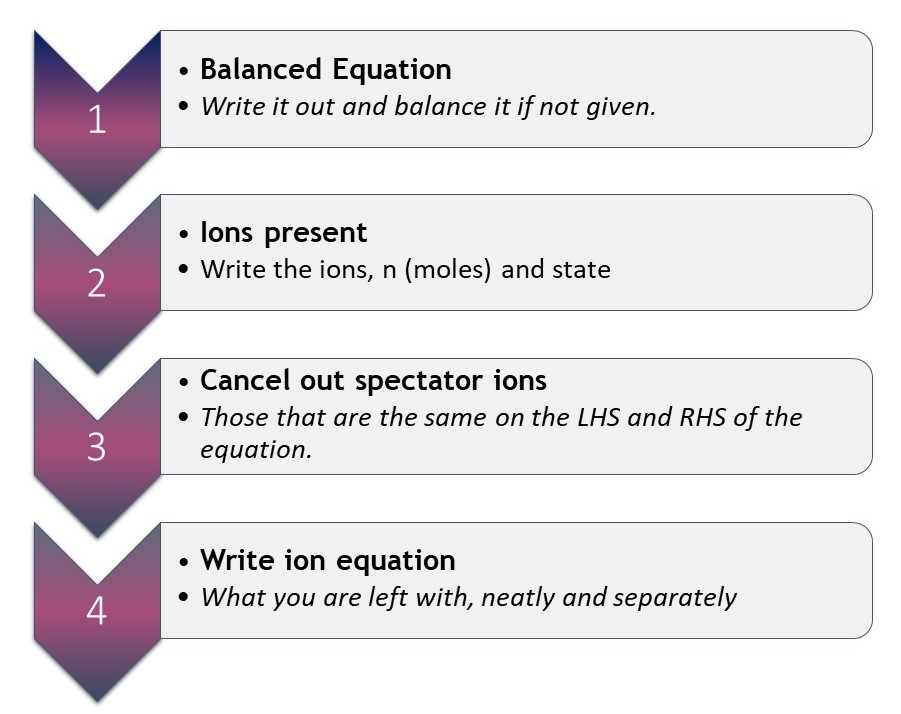
Like mole claculations, this is another “how to do” process. Unfortunately, it is one of those processes that is sometimes left to be caught, rather than taught. I am no longer surprised when students I tutor struggle with it. It is, however, relatively easy to fix when you have laid out the process explicitly. I am not dealing with those REDOX equations here though: they have some more layers and deserve more detailed attention than there is space for here. Suffice to say, there are oxidation numbers and balancing electrons to add. If you do want to know more about them, you can find a tutorial about that process here. So, how do you go about writing ionic equations for say, precipitation reactions, or the neutralisation reaction?
How to write ionic equations.
Why not try it out by writng an ionic equation for the reaction between copper sulfate and sodim hydroxide solutions to form sodium nitrate solution and copper hydroxide solid?
Process 5: Reflux
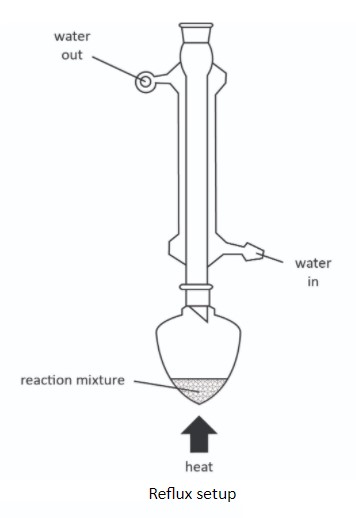
Here is a practical laboratory process in organic chemistry that you need to know about. Chemistry is a practical subject after all, so we must not forget about practical processes. Reflux is a technique that fits into Step 3 of Stages in a Laboratory Preparation, an overarching process described earlier. Reflux is the process we use when we are synthesising organic liquids, for example, oxidising a primary alcohol to form a carboxylic acid. Forming cyclohexene from cyclohexanol might be another, specific reaction that you have performed in the laboratory. The diagram here is not a process diagram in the same sense as all the other examples I have shared. Nevertheless, it is a diagram of a process in Chemistry.
The purpose of the technique is to mix the reactants in suitable apparatus and conditions in order to complete the reaction. When using voltaile liquids as we do in organic chemistry, heating under reflux allows us to hold the reaction mixture in the appropriate conditions (high temperature) by heating it constanly over the period of time for the reaction to take place. Evaporating liquids are condensed in the condensor and dropped back into the flask, thereby preventing loss of reactant through evaporation.
You must take note of how to draw chemical apparaus accurately. Joints and seals should be correct and it should work. Students very often only draw the “gist of it”. The reaction mixture should be labelled with the specific chemicals and quantities given in the question. Perhaps this is another topic to be dealt with in detail another day.
You can get your pdf copy of the Map for Mole Calculations and Infographic here and if you would like any of the others, contact me here.
